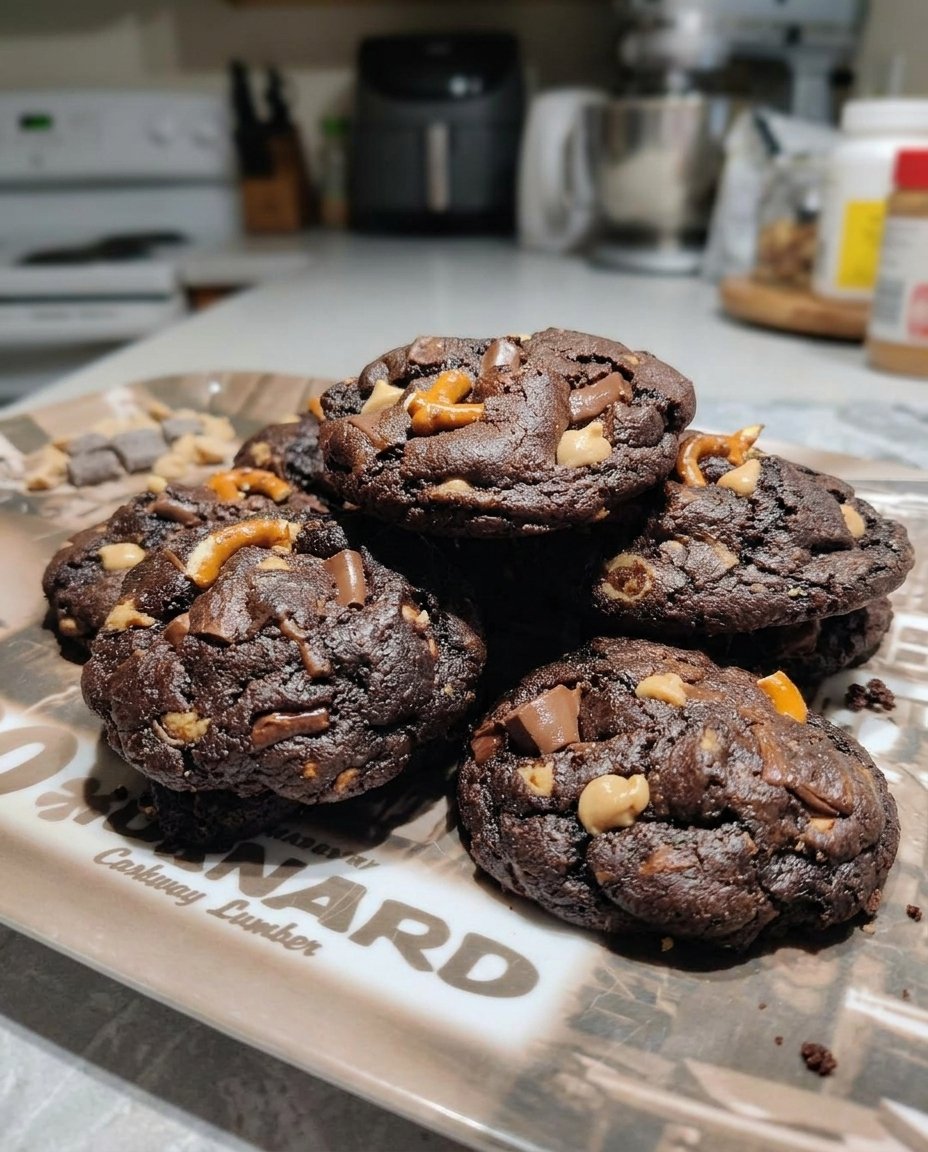
Walking through the winter farmers market, I saw a stall selling handmade peppermint bark that looked like shards of fallen snow. It reminded me how nature provides the most striking contrasts—the deep, dark earthiness of cocoa against the bright, crisp white of mint. This Cute Cookie Aesthetic 4 recipe is my way of bringing that natural winter beauty to your cookie sheets with a wholesome, loaded feel.

These cookies capture that festive spirit by loading a rich chocolate base with creamy white chocolate chunks and a generous coating of crushed peppermint. They are simple to put together but offer a visual abundance that makes them look like they came straight from a cozy farmhouse bakery. You get all the deep flavor of a decadent treat with the bright, refreshing snap of real peppermint in every bite.
A Wholesome Celebration of Winter Colors
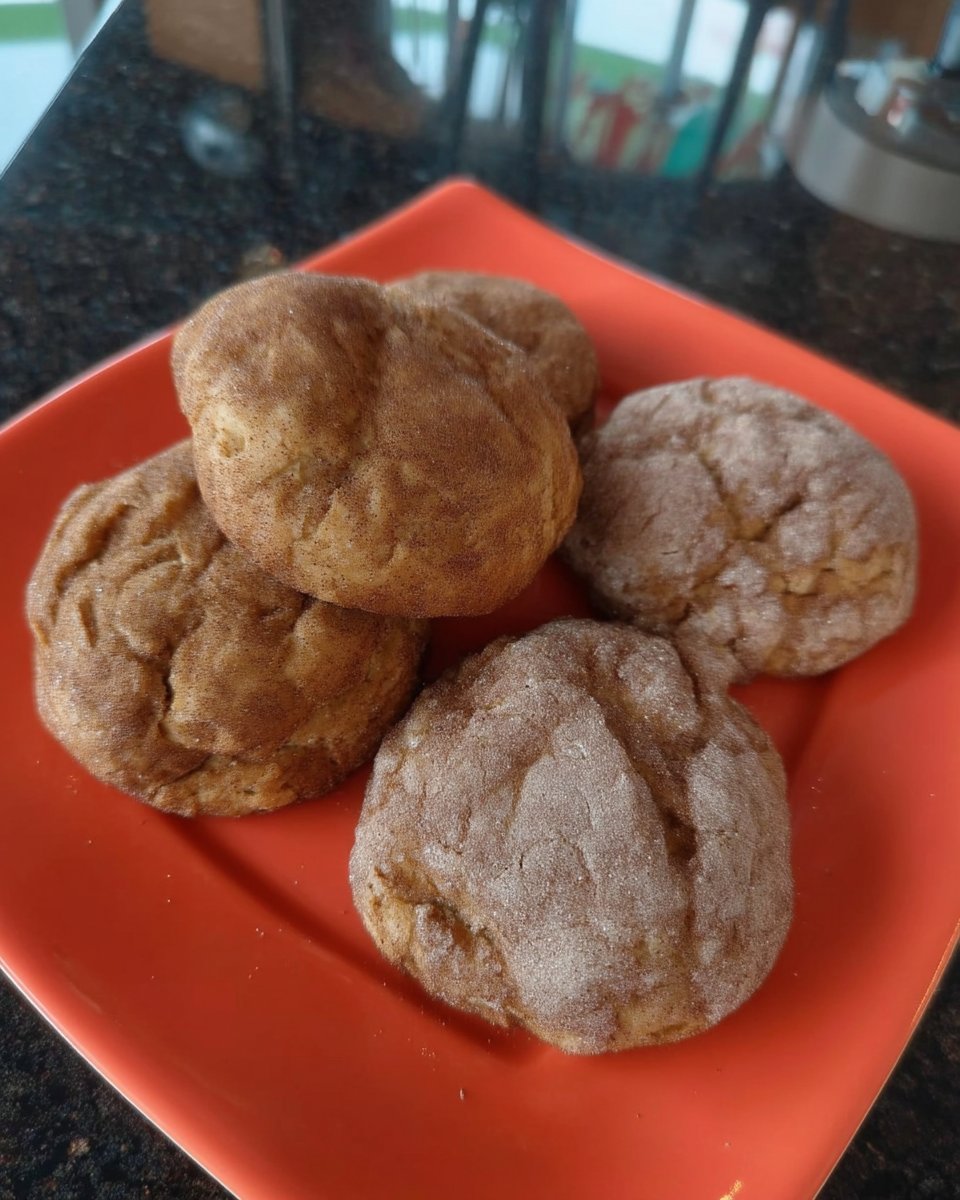
There is something truly magical about the way these cookies look on a wooden cooling rack after a long afternoon in the kitchen. The deep, dark chocolate base creates a canvas that makes the white chocolate and peppermint pop like a fresh snowfall in the forest. When we talk about a Cute Cookie Aesthetic 4, we are talking about that perfect balance of natural dark tones and bright, festive highlights that feel both modern and timeless. These aren’t just cookies; they are a visual treat that brings a bit of farmhouse charm to your holiday dessert table without any artificial fuss.
The texture is where the real joy lies for anyone who loves a good cookie. By using a specific pan-banging method during the bake, we create beautiful, natural ripples that give each cookie an artisanal, handmade feel. It is the kind of wholesome loaded treat that feels special because it celebrates real textures—the smoothness of the white chocolate and the sharp, clean crunch of the peppermint bits. You will love how the cool peppermint cuts through the richness of the devil’s food base, creating a flavor profile that is both decadent and incredibly refreshing.
I love how these cookies feel in your hand—they are heavy, thick, and full of character. They prove that you do not need hours of prep or a hundred different ingredients to create something that looks like it belongs on a magazine cover. It is about using a few quality items and treating them with respect. Whether you are baking for a school swap or just filling your own cookie jar, these bars bring a sense of natural abundance and holiday spirit to every home. They are a happy reminder that the most beautiful things in life are often the simplest ones we make ourselves.
Print
Cute Cookie Aesthetic 4 Peppermint Bark Cookies
- Total Time: 21 mins
- Yield: 24 cookies
- Diet: Vegetarian
Description
Celebrate the winter season with these visually stunning chocolate peppermint cookies featuring a rich, fudgy base and a crunchy mint topping. Utilizing a unique pan-banging technique, these treats develop artisanal ripples that perfectly complement the creamy white chocolate chunks tucked inside.
Ingredients
- 1 box Devil’s Food Cake Mix
- 1/2 cup Unsalted Butter, melted
- 2 tbsp Coconut Oil
- 2 Large Eggs
- 1 cup White Chocolate Peppermint Bark, finely chopped
- 1/2 cup Crushed Peppermints
Instructions
- In a large bowl, whisk together the cake mix, eggs, melted butter, and coconut oil until the dough is smooth and glossy.
- Fold the chopped white chocolate peppermint bark into the dough, then cover and chill in the refrigerator for 10 minutes.
- Preheat your oven to 350°F (175°C) and line two large baking sheets with parchment paper.
- Scoop golf ball-sized portions of dough and roll the tops in the crushed peppermints, pressing gently to adhere.
- Place the dough balls on the prepared sheets, flatten slightly into thick discs, and bake for 3 minutes.
- Remove the pans and firmly bang them against a solid surface 6 times to create ripples, then bake for an additional 3 minutes.
Notes
To ensure the most dramatic ripples, make sure your baking sheets are not warped and that you bang them on a very sturdy, heat-safe surface. If the crushed peppermint starts to lose its vibrancy during the bake, feel free to press a few extra fresh bits into the tops of the cookies immediately after they come out of the oven.
- Prep Time: 15 mins
- Cook Time: 6 mins
- Category: Dessert
- Method: Baking
- Cuisine: American
Gathering Your Natural Abundance

To create these stunning treats, we start with a few simple building blocks that emphasize quality and texture. While we use a cake mix for the base, we treat it like a raw material to be loaded with fresh, vibrant additions that define our Cute Cookie Aesthetic 4 style.
- Devil’s Food Cake Mix: This provides the deep, dark foundation of our cookie. It is like the rich, fertile soil of a garden, ready to hold all the beautiful toppings we are about to add. It gives a consistent, fudgy texture that pairs perfectly with mint.
- Unsalted Butter: We use melted butter to give the cookies a soft, rich interior. It adds a layer of wholesome fat that makes the dough easy to work with and results in a melt-in-your-mouth finish.
- Coconut Oil: This is my little secret for giving the cookies a beautiful, natural shine and a slight snap on the edges. It helps the chocolate flavor feel more intense and keeps the cookies moist for days.
- Large Eggs: These act as the binder, giving our thick dough the structure it needs to rise and then settle into those iconic crinkly ripples we love.
- White Chocolate Peppermint Bark: Finely chopped pieces of high-quality bark ensure that every bite has a creamy, sweet contrast to the dark cocoa. The peppermint bits inside the bark add layers of flavor that build as you eat.
- Crushed Peppermints: This is our natural color source. The bright reds and whites are purely festive and provide a satisfying crunch that mimics the crackle of a winter fire. I like to use a variety of sizes for a more organic, rustic look.
Using these ingredients together creates a symphony of textures. The soft, chewy chocolate dough is the perfect host for the hard crunch of the peppermint and the smooth melt of the white chocolate. It’s a wonderful way to celebrate the abundance of the season without feeling like you’re over-complicating the process.
The Simple Path to Festive Treats
Step 1: Mix the Earthy Dough
In a large glass bowl, whisk together your devil’s food cake mix, large eggs, melted unsalted butter, and the coconut oil. You will notice the dough becomes quite thick and starts to pull away from the sides—that is exactly what we want. Once it is just combined, switch to a sturdy spatula and mix until the dough is smooth and glossy. The dark color should be rich and uniform.
Step 2: Fold in the White Chocolate
Take your finely chopped white chocolate or peppermint bark and gently fold it into the dark dough. You want these chunks to be distributed throughout so that every bite is wholesome and loaded. Cover the bowl with plastic wrap and let it rest in the refrigerator for about 10 minutes. This chilling time helps the fats solidify slightly, making the dough easier to scoop and helping those beautiful ripples form later.
Step 3: Prepare Your Space
While the dough chills, arrange a rack in the center of your oven and preheat it to 350°F (175°C). Line two large baking sheets with parchment paper and give them a light spray of cooking oil. This prevents the peppermint from sticking and keeps the bottom of your cookies perfectly tender.
Step 4: Scoop and Roll
Using a small cookie scoop, create golf ball-sized portions of dough. Pour your crushed peppermints onto a flat plate. Roll the tops of each dough ball in the candies, pressing gently so they adhere well. You want a thick layer of mint on top to achieve that perfect Cute Cookie Aesthetic 4 look. Place them on the prepared sheets with plenty of space between each one.
Step 5: Flatten and Bake
Gently press down on the tops of the balls with the palm of your hand to slightly flatten them into thick discs. Slide them into the oven and bake for exactly 3 minutes. This initial burst of heat starts the rising process and sets the outer edges.
Step 6: The Pan Bang
After 3 minutes, remove the pans and firmly bang them against a solid surface like a wooden cutting board or the top of your stove about 6 times. You will see the cookies deflate and create beautiful ripples. Return them to the oven and bake for another 3 minutes until the tops are no longer glossy but the centers still feel soft. Let them cool on the sheets for 10 minutes before moving to a wire rack.
Christine’s Secrets for Holiday Success

To get the absolute best results with this Cute Cookie Aesthetic 4 recipe, the pan-banging technique is your best friend. This method, which I also use for my copycat Crumbl cookies, creates those gorgeous concentric circles that make the cookies look professional. When you bang the pan, you are forcing the air out and creating a fudgy, dense center with crisp, wavy edges. Don’t be afraid to be a little loud with it—it’s part of the fun of holiday baking!
Another tip for keeping your peppermint bright and beautiful is to store these cookies with a small piece of parchment paper between the layers. Peppermint can sometimes get sticky if there is too much moisture in the air, so keeping them in a cool, dry place is key. If your peppermint starts to melt during the bake, try adding a few extra fresh crushed pieces on top immediately after you take them out of the oven. This adds a fresh pop of color and a bit of extra crunch that makes the cookies feel even more abundant.
Seasonal Swaps for Every Spirit
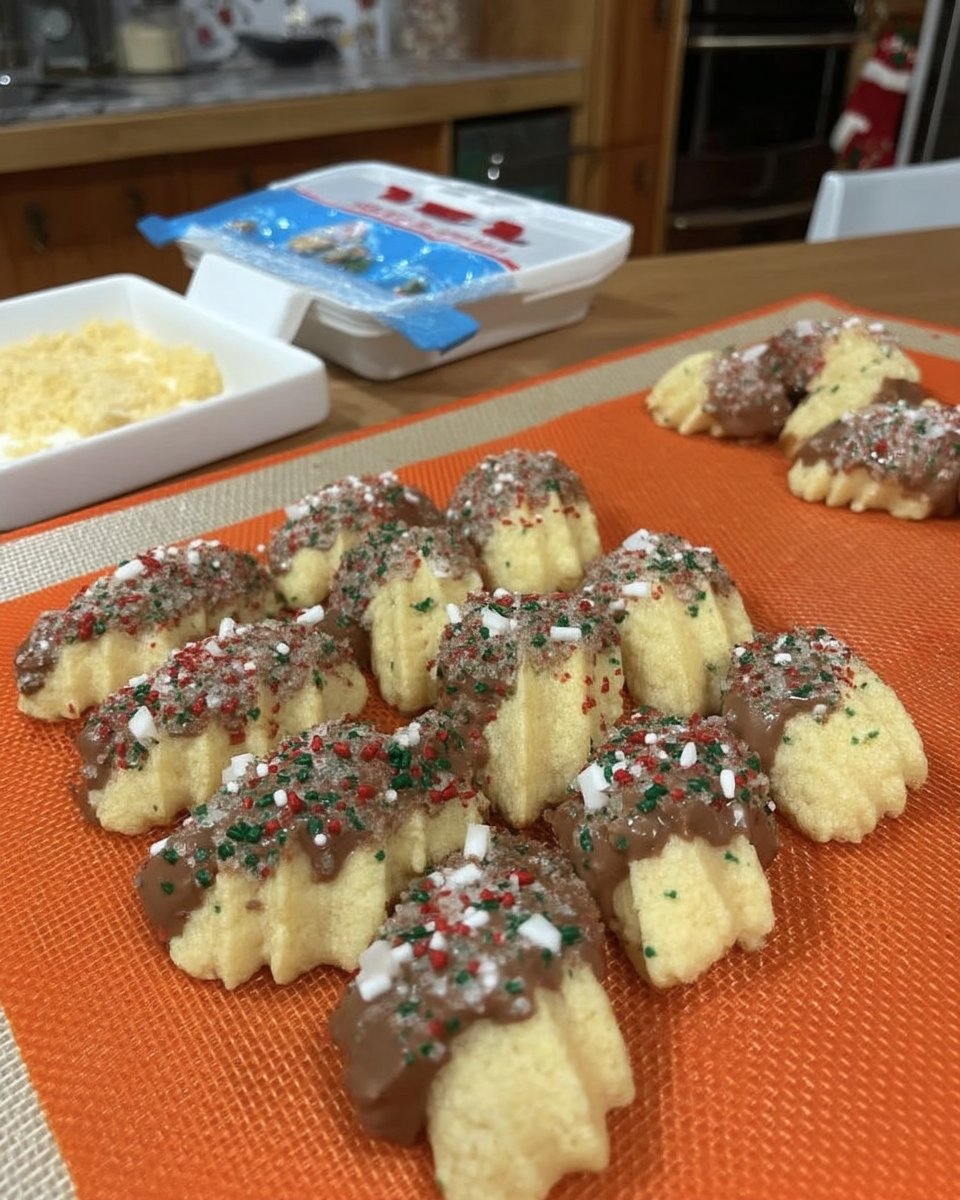
If you want to move away from the peppermint theme but keep the rich chocolate base, you have so many wonderful options. For a more traditional farmhouse feel, swap the peppermint for toasted walnuts or pecans. The natural oils in the nuts bring a deep, earthy flavor that complements the devil’s food cake mix perfectly. You could even try adding a hint of orange zest to the dough for a classic chocolate-orange combination that feels very festive and warm. For another take on a classic shape, you might enjoy my guide to butter spritz cookies which offers great ideas for natural decorations.
For those who love a bit of natural color, you can use freeze-dried raspberries instead of peppermint. Crush the raspberries into a coarse powder and roll the cookies in them; the tartness of the berries is a beautiful match for the sweet white chocolate. If you are looking for even more inspiration on how to use cake mixes as a base for beautiful treats, I highly recommend looking at this classic cake mix cookie guide for more ideas on loading your bakes with seasonal ingredients.
Presenting Your Natural Masterpiece

When it comes to serving these cookies, I think they look best on a simple wooden platter or a vintage ceramic plate. The dark chocolate and bright white peppermint stand out beautifully against natural textures. I love serving these during a cozy afternoon tea or after a big family dinner. If you are looking for a softer, more pillowy cookie to serve alongside these, my swig sugar cookies are a wonderful companion that balances the richness of the chocolate.
For a truly festive experience, serve these cookies with a warm mug of cocoa topped with real whipped cream. The peppermint in the cookie will slightly melt if you dip it, creating a wonderful minty chocolate drink. If you are hosting a larger gathering, you can arrange them in a circle with some fresh pine branches and cinnamon sticks around the base of the platter. This brings a bit of the outdoors in and highlights the natural abundance of your holiday baking.
The Lasting Joy of Abundant Baking
Baking these cookies is about more than just satisfying a sweet tooth; it is about creating a moment of beauty in the middle of a busy season. The Cute Cookie Aesthetic 4 is all about that intersection of simple ingredients and striking visual results. I hope you find as much joy in the process of banging the pans and rolling the dough as you do in eating the finished treats. For more ideas on how to make your holiday bakes special, be sure to check out our collection of festive cookie moments for inspiration throughout the year.
Don’t forget to share your beautiful creations with our community! We love seeing how you bring your own touch of natural beauty to these recipes. You can find more tips and behind-the-scenes farmhouse baking on our Instagram, Pinterest, and Facebook pages. Happy baking, and may your kitchen always be full of wonderful scents and colorful treats!
