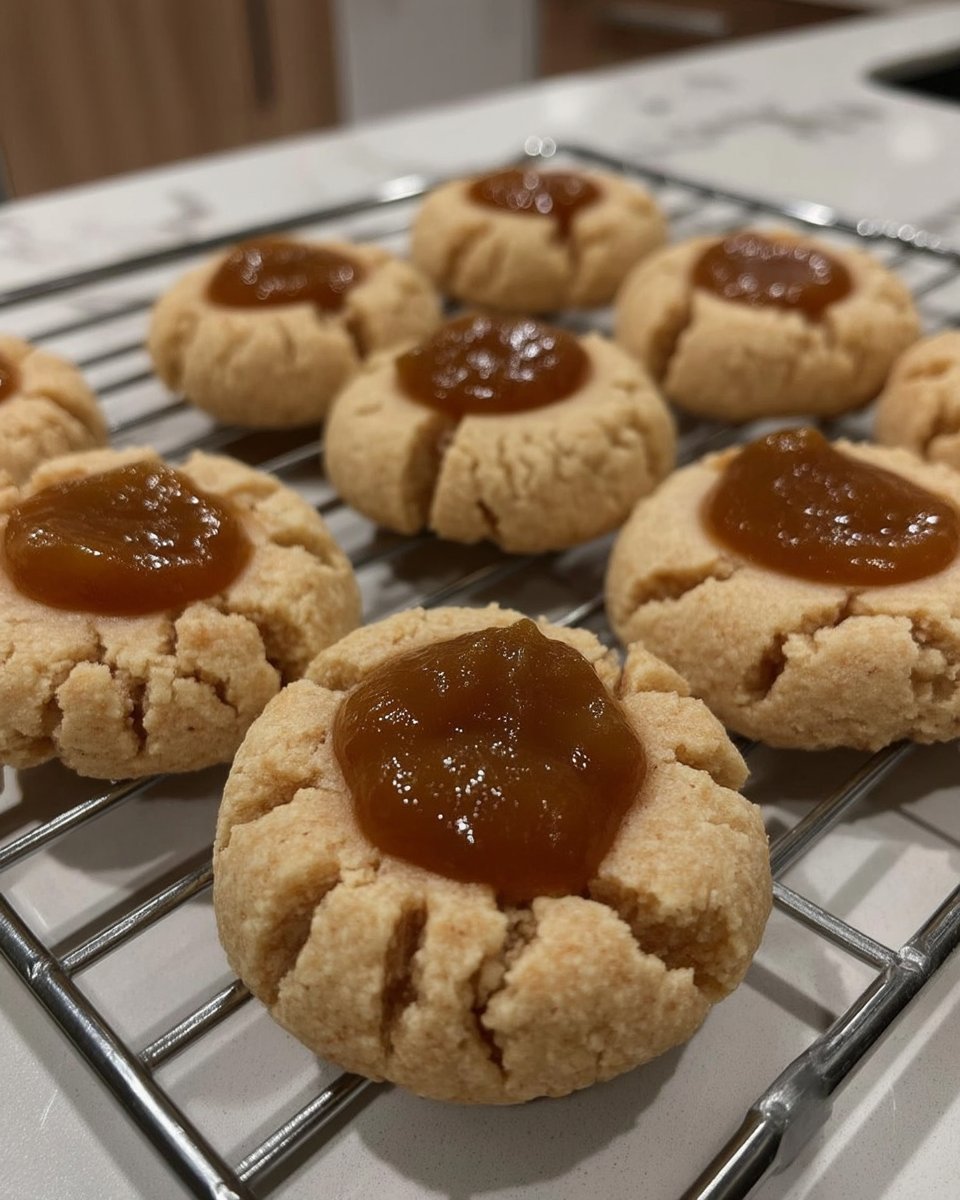
A solid cookie foundation is like a good pair of shoes; it carries everything else with grace. I remember watching my mother cream butter and sugar until it was just the right shade of pale ivory, a technique that ensures every bite is light and tender. These Apricot Thumbprint 2 cookies rely on that same classic wisdom to create a treat that is both beautiful and deeply satisfying.

This recipe creates a dough that is strong enough to hold a generous well of jam without cracking or spreading too thin. The combination of salted butter and a touch of brown sugar gives the base a rich, complex flavor that balances the bright sweetness of the apricot. It is a reliable method that I have shared with countless friends who want a cookie that tastes as good as it looks.
The Foundation of a Classic Cookie
You will love this recipe because it prioritizes the texture of the dough above all else. Many thumbprint recipes result in a dry, crumbly cookie that falls apart, but this version uses an egg yolk to keep things soft and rich. The dough is easy to handle, making it a wonderful project for baking with children or grandchildren who want to help press those little wells into the center. Another reason to cherish these cookies is their timeless appeal on any dessert table. Whether you are hosting a formal gathering or just want a sweet snack for the cookie jar, these gold-rimmed gems fit right in. They offer a nostalgic taste that reminds us why foundational baking techniques are still the best way to show love through food.
Print
Apricot Thumbprint Cookies
- Total Time: 30 mins
- Yield: 24 cookies
- Diet: Vegetarian
Description
These elegant Apricot Thumbprint Cookies feature a tender, buttery shortbread base filled with a bright well of sweet apricot preserves. Perfect for holidays or tea time, this classic recipe yields a soft and rich texture that melts in your mouth.
Ingredients
- 1 cup salted butter, softened
- 1/2 cup granulated sugar
- 1/4 cup packed brown sugar
- 1 large egg yolk
- 1 teaspoon vanilla extract
- 2 cups all-purpose flour
- 1/2 cup thick apricot jam
Instructions
- Preheat your oven to 350°F (175°C) and line your baking sheets with parchment paper or silicone mats to prevent sticking.
- In a large mixing bowl, cream the softened salted butter, granulated sugar, and packed brown sugar on high speed for at least one minute until the mixture is pale and fluffy.
- Add the egg yolk and vanilla extract to the butter mixture, continuing to beat until the wet ingredients are light and well-emulsified.
- Reduce the mixer speed to low and gradually add the all-purpose flour, mixing only until just incorporated and no white streaks remain.
- Roll the dough into one-tablespoon sized balls and place them on the baking sheet with two inches of space between them; press a gentle indent into the center of each ball using your thumb.
- Carefully fill each well with about half a teaspoon of apricot jam and bake for 10 to 12 minutes until the bottoms are light golden brown and the jam is bubbling.
Notes
For the cleanest look, ensure your hands are warm when rolling the dough to prevent surface cracks, and use a small spoon to carefully fill the indents so the jam doesn’t spill over the edges. If you prefer a firmer cookie, you can let the jam set completely at room temperature for several hours before storing them in an airtight container.
- Prep Time: 20 mins
- Cook Time: 10 mins
- Category: Dessert
- Method: Baking
- Cuisine: American
Quality Ingredients for the Best Dough

Creating the perfect base for your Apricot Thumbprint 2 cookies starts with selecting the best possible components. When the ingredient list is short, the quality of each item truly shines through in the finished product. Make sure your ingredients are at the proper temperature before you begin.
- Salted Butter: I always recommend using a high-quality salted butter for these cookies. The salt helps to cut through the sugar and brings out the creamy notes of the dairy. Make sure it is softened to room temperature so it creams properly.
- Granulated and Brown Sugar: Using a mix of white and brown sugar provides the best of both worlds. The granulated sugar gives the edges a nice crispness, while the brown sugar adds moisture and a hint of molasses flavor to the crumb.
- Egg Yolk: This is a key part of our foundation. By using only the yolk instead of the whole egg, we add richness and fat without the extra water found in the whites. This prevents the dough from becoming cakey.
- Vanilla Extract: A pure vanilla extract is essential for that classic home-baked aroma. It ties all the other flavors together.
- All-Purpose Flour: This provides the structure. Be careful not to over-measure your flour, as too much will lead to a stiff dough that cracks when you try to make the thumbprint indent.
- Apricot Jam: Choose a jam that is thick and fruit-forward. If your jam is too thin, it may run over the edges of the cookie during the baking process.
The Classic Method
Step 1: Prep and Preheat
Begin by preheating your oven to 350℉ (175℃). This ensures the cookies start baking immediately upon entry, which helps them hold their shape. Line your baking sheets with parchment paper or silicone mats to prevent sticking and to help the bottoms brown evenly.
Step 2: Cream the Butter and Sugars
In a large mixing bowl, combine your softened salted butter, granulated white sugar, and packed brown sugar. Use an electric handheld mixer on high speed for at least one full minute. You are looking for a mixture that is pale, fluffy, and well-combined. This step builds the air into the dough that creates a tender bite.
Step 3: Incorporate the Wet Ingredients
Add the single egg yolk and the teaspoon of vanilla extract to the butter mixture. Continue to cream the ingredients together until the mixture looks light and airy. This ensures the fat and sugars are perfectly emulsified before you introduce the dry ingredients.
Step 4: Mix in the Flour
Turn your mixer down to the lowest speed and gradually add the all-purpose flour. Mix only until the flour is just incorporated and no white streaks remain. Over-mixing at this stage can develop too much gluten, which would result in a tough cookie rather than a melt-in-your-mouth shortbread.
Step 5: Shape and Indent
Scoop about one tablespoon of dough at a time and roll it between your palms to form a smooth, uniform ball. Place the balls on the prepared baking sheet, leaving about two inches of space between them. Use your thumb or a floured round measuring spoon to gently press an indent into the center of each ball.
Step 6: Fill and Bake
Carefully fill each indent with about half a teaspoon of apricot jam. Bake the cookies one pan at a time for 10 to 12 minutes. You will know they are done when the bottoms are a light golden brown and the jam is bubbling happily. Let them cool on the baking sheet for at least 10 minutes to set before moving them to a wire rack.
Dough Wisdom and Success Secrets

To ensure your Apricot Thumbprint 2 cookies turn out perfectly every time, I suggest chilling the dough for about 30 minutes if your kitchen is particularly warm. Cold dough is much easier to roll and is less likely to spread too much in the oven. Also, if you find that your thumb is sticking to the dough, a small dip in flour for your thumb or your measuring spoon will solve the problem instantly. If you enjoy the texture of this base, you might also want to try our butter spritz cookies which utilize a similar foundational technique for a different classic shape. Always remember that the secret to a professional look is uniformity; using a small cookie scoop ensures every treat is the same size and bakes at the same rate. Finally, don’t overfill the indents, as the jam expands as it heats up and can spill over the sides of the cookie.
Build On This Base
Once you have mastered this classic dough, you can use it as a canvas for many other flavors. For a deeper, nuttier taste, try browning the butter before letting it solidify again and creaming it. You can also swap the vanilla extract for almond extract, which pairs beautifully with the apricot filling. If you are in the mood for something even more indulgent, this dough is sturdy enough to be used in other ways, such as making peanut butter blossom cookies by swapping the jam for a chocolate kiss after baking. You could even roll the dough balls in crushed nuts or sparkling sugar before making the indent for extra texture and visual flair. Some bakers even like to drizzle a bit of white chocolate over the cooled jam centers for a truly fancy finish.
Classic Enjoyment and Sharing

These cookies are best enjoyed when they have had time to fully cool and the jam has set into a chewy, sweet center. I love to serve them on a vintage platter alongside a cold glass of milk or a hot cup of Earl Grey tea. They are a staple for holiday cookie exchanges because they are sturdy enough to be stacked and transported without breaking. For another wonderful tea-time treat that focuses on a buttery crumb, take a look at our scottish shortbread recipe. These thumbprints also make a beautiful gift when tucked into a tin with layers of parchment paper between them. They stay fresh in an airtight container for up to five days, though they rarely last that long in my house!
The Sweet Foundation
At the heart of every great baker is a respect for the basics. These Apricot Thumbprint 2 cookies prove that you don’t need a hundred ingredients to make something truly special; you just need a solid dough and a little bit of care. I hope this recipe becomes a cherished part of your baking rotation, serving as a reliable base for all your creative jam-filled adventures. If you found this helpful, you might also enjoy our dipped shortbread for more buttery goodness. Please share your creations with us on Facebook, Instagram, Pinterest, or TikTok! Happy baking!
