In my kitchen, the foundation of a great bake always starts with the simple, buttery wisdom passed down through generations. These Sandkuchen Cookies represent that solid base where quality ingredients and steady technique meet to create something truly wonderful. I have always believed that before you go wild with toppings or fillings, you must respect the dough.

This recipe is a masterclass in achieving that tender, crumbly texture that defines a perfect sand cookie. By focusing on the temperature of your butter and the patience of a good rest, you will create a cookie that melts away with every bite. It is a reliable classic that proves why foundational baking is the heart of every home.
The Foundation of a Perfect Crumb
You are going to love these Sandkuchen Cookies because they celebrate the pure, unadulterated joy of high-quality butter and sugar. In a world of over-the-top desserts, there is something deeply comforting about a cookie that relies on technique rather than gimmicks. This dough is sturdy enough to hold its shape but delicate enough to crumble the moment it hits your tongue. It provides the perfect canvas for your creativity, whether you want to enjoy them plain with a cup of tea or use them as a base for more elaborate decorations. The beauty of this recipe lies in its simplicity; it is a treasure for any baker who appreciates the heritage of European baking. When you nail this foundation, you realize that you do not need a dozen ingredients to make something spectacular. It is about how those few ingredients work together to create a texture that is both rich and light. This is the kind of recipe that becomes a staple in your household, the one that everyone asks for because it tastes like home.
Print
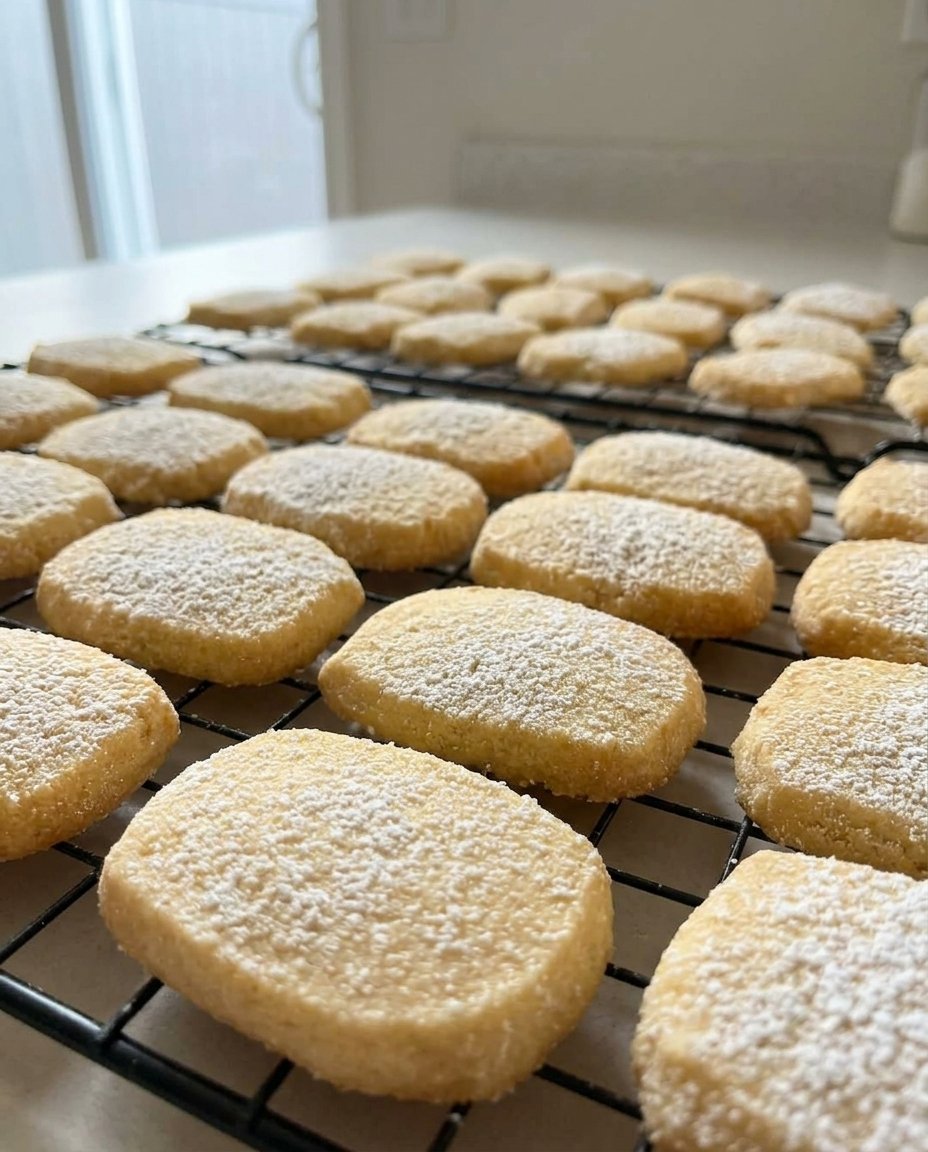
Sandkuchen Cookies
- Total Time: 1 hour 31 mins
- Yield: 24 cookies
- Diet: Vegetarian
Description
These traditional German Sandkuchen Cookies offer a masterclass in texture, delivering a buttery, delicate crumb that literally melts in your mouth. Perfect in their simplicity, they are the ideal companion for your afternoon tea or coffee ritual.
Ingredients
- Unsalted butter, high-fat European-style preferred, room temperature
- Soft white sugar
- Vanilla sugar
- 1 Egg yolk, room temperature
- All-purpose flour
- Pinch of salt
Instructions
- In a large mixing bowl, cream the room-temperature butter, white sugar, and vanilla sugar for 3 to 5 minutes until the mixture is pale and fluffy.
- Add the egg yolk to the creamed mixture and beat on medium speed until the batter is smooth and fully integrated.
- Sift the flour and salt together, then gently fold them into the wet ingredients on the lowest setting until just combined.
- Wrap the dough in cling film, shape into a disk, and refrigerate for at least one hour or overnight to hydrate the flour.
- Preheat your oven to 180°C (350°F) and line a baking tray with greaseproof paper.
- Roll the chilled dough into small, even balls and place them on the tray, then use a fork to gently flatten each one with a cross-hatch pattern.
- Bake for approximately 16 minutes until the edges are light golden brown, then let them firm up on the tray for 5 minutes before moving to a wire rack.
Notes
For the most consistent results, use a kitchen scale to measure your flour precisely, as even a small excess can make these delicate cookies too dry. If you find the dough becomes too soft while shaping, return it to the refrigerator for 10 minutes before placing the tray in the oven to prevent over-spreading.
- Prep Time: 1 hour 15 mins
- Cook Time: 16 mins
- Category: Dessert
- Method: Baking
- Cuisine: German
Quality Ingredients for the Perfect Base

To make these cookies truly shine, you must start with the best components you can find. Every single item in this short list plays a vital role in the final texture and flavor profile.
- Unsalted Butter: Use the best quality butter you can find. Since this is the primary flavor, a high-fat European-style butter makes a significant difference. It should be at room temperature—soft enough to give under pressure but not melting.
- Soft White Sugar: This provides the sweetness and helps create that fine, sandy texture. It needs to be well-incorporated to avoid any graininess in the finished bake.
- Vanilla Sugar: This is a classic European touch. It adds a gentle, floral aromatic that extract sometimes misses. If you cannot find it, you can make your own by burying vanilla beans in a jar of sugar.
- Egg Yolk: The yolk is the secret to the richness. While a whole egg adds moisture and structure, the yolk alone provides a tender, melt-in-your-mouth quality that defines the sand cookie.
- All-Purpose Flour: This provides the structure. Measuring it correctly is essential; too much flour will make the cookies tough, while too little will make them spread into puddles.
- Pinch of Salt: Even in a sweet cookie, a tiny bit of salt balances the richness of the butter and helps the vanilla flavors pop.
Working with these ingredients at the right temperature is what separates a good cookie from a great one. When your butter and egg yolk are both at room temperature, they emulsify perfectly, creating a smooth dough that bakes up evenly every time.
The Classic Method
Step 1: Cream the Foundation
Start by placing your room-temperature unsalted butter, soft white sugar, and vanilla sugar into a large mixing bowl. Use a hand mixer or a stand mixer to cream these together until the mixture is pale and fluffy. This process is not just about mixing; it is about beating air into the fat, which helps the cookies stay light. Take your time here—three to five minutes is usually just right.
Step 2: Incorporate the Richness
Add the single egg yolk to your creamed butter mixture. Continue to mix on a medium speed until the yolk is fully integrated and the batter looks smooth. You might need to scrape down the sides of the bowl with a spatula to make sure everything is evenly combined. This yolk is what gives the dough its beautiful golden hue and tender crumb.
Step 3: Add the Dry Ingredients
Sift your flour and salt together, then add them to the wet ingredients. Turn your mixer to the lowest setting or use a wooden spoon to fold the flour in. Mix just until no white streaks remains. Overworking the dough at this stage will develop the gluten and make the cookies chewy instead of crumbly, so be gentle. The dough should feel firm but pliable.
Step 4: The Essential Rest
Turn the dough out onto a piece of cling film. Shape it into a disk or a log, wrap it tightly, and place it in the refrigerator. This rest period is vital. It allows the flour to fully hydrate and the butter to firm back up, which prevents the cookies from spreading too much in the oven. Let it chill for at least one hour, though overnight is even better for flavor development.
Step 5: Shape and Flatten
Preheat your oven to 180°C (350°F). Line a baking tray with greaseproof paper. Take small portions of the chilled dough and roll them into even balls between your palms. Place them on the tray with about two inches of space between them. Use a fork to gently flatten each ball, creating a classic cross-hatch pattern or a simple indentation. This helps them bake evenly.
Step 6: Bake to Golden Perfection
Slide the tray into the center of the oven and bake for approximately 16 minutes. You are looking for the edges to turn a light golden brown while the centers remain pale. They will look soft when you first pull them out, but do not worry. Leave them on the tray for five minutes to firm up, then move them to a wire rack to cool completely. The patience you show now will be rewarded with a perfect crunch later.
Teresa’s Dough Wisdom

One of the most important secrets to a successful sand cookie is the temperature of the butter. If the butter is too cold, it will not cream properly; if it is too oily or melted, the cookies will lose their structure. I always suggest taking the butter out of the fridge at least an hour before you plan to bake. If you find yourself in a hurry, you can learn more about managing dough textures in our heidesand-recipe. Another tip is to use a scale for your flour. Volume measurements can be inconsistent, and in a recipe with so few ingredients, accuracy is key. If you want to see how these techniques compare to other European traditions, you might find the methods for Dutch sand cookies quite interesting for your collection. Remember, the dough should feel like damp sand before it comes together—if it feels too sticky, give it a bit more time in the fridge.
Build On This Base
Once you have mastered this classic dough, you can treat it as a foundation for all sorts of creative twists. For a deeper, nuttier flavor, you can try browning the butter and letting it solidify again before creaming. You might also consider adding the zest of a lemon or orange to the sugar for a bright, citrusy note that cuts through the richness. If you enjoy a bit of a decorative flair, this dough works beautifully when pressed through a cookie press, much like our butter-spritz-cookies. For those who love a bit of chocolate, dipping half of the cooled cookie into melted dark chocolate and sprinkling it with sea salt creates a sophisticated treat. You could even sandwich two small cookies together with a bit of raspberry jam or lemon curd to turn them into a delicate tea sandwich cookie.
Classic Enjoyment

These cookies are best enjoyed simply, allowing the buttery flavor to take center stage. I love serving them alongside a hot cup of Earl Grey tea or a dark roast coffee, where the slight bitterness of the drink perfectly complements the sweetness of the bake. They are a wonderful addition to any holiday cookie platter, providing a quiet balance to more colorful or frosted treats. If you are a fan of traditional shortbread textures, you might also enjoy comparing these to our scottish-shortbread. For a more formal gathering, serve them on a vintage tiered stand with fresh berries and a dollop of whipped cream on the side. They also make a thoughtful homemade gift when stacked in a simple parchment-lined tin tied with a piece of twine.
The Sweet Foundation
Baking these Sandkuchen Cookies is a reminder that the best things in life often come from the most basic foundations. When you take the time to cream your butter properly and let your dough rest, you are honoring a tradition of quality that has lasted for decades. I hope this recipe finds a permanent place in your recipe box and brings a bit of warmth to your kitchen. Once you feel confident with this dough, feel free to try other traditional German treats like our nussecken-recipe. Please share your baking results with us on Pinterest, Instagram, or Facebook. Happy baking, and remember that a good foundation makes all the difference.


